

Whether you are a developer building a WordPress site for a client, or a business owner building your own WordPress site, you want the development experience to be as straightforward as possible.
The WordPress admin dashboard is the beating heart of any WP website. But while the good folks at WordPress do their best to provide a convenient, intuitive interface for you to work with, there is no such thing as a one-size-fits-all dashboard design.
That’s where the ability to customize the admin dashboard comes in. Customizing the admin page reduces confusion, cuts down on mistakes and enhances productivity. So in this article, we’re going to take a close look at some simple, effective methods for customizing your WordPress dashboard.
Why Should You Customize Your WordPress Dashboard?
Think of the WordPress admin page as your office. It’s hard to run a business if your office is cluttered with all kinds of stuff you don’t need and will never use. It’s also hard to feel comfortable if you’re working in an office that reflects someone else’s tastes and sensibilities. You want it to be yours, to reflect your tastes, your needs, your way of working.
In addition, if you are a developer who will be turning the site over to a client after launch it’s important that the admin area be as clean and clear as possible. That way the client’s webmaster can hit the ground running.
The default admin dashboard is designed to provide a starting point. Not to be an end in and of itself. WP provides the ability to customize this area and we would encourage both developer and business owner alike to take advantage of this opportunity.
Don’t Forget to Backup First
Before making any significant changes to a WordPress site it’s always important to do a backup. In the past, this was a fairly labor-intensive process. But not anymore. There are dozens of free plugins available now that will do a complete backup for you with just a couple of clicks. Here’s how to install one.
- On the dashboard sidebar look for “Plugins”.
- Hover over it and a submenu will appear.
- Click “Add new”. This will take you to the plugin page.
- Enter “backup” in the search box.
- Choose one of the numerous plugins that appear.
- Click “install”, then click “activate”.
Note: all the plugins here have been vetted by WordPress so there’s no need to worry if they’re safe.
Once the backup plugin is activated use it to perform a backup of your site. Once that is done you are ready to customize the admin dashboard.
But What About Child Themes?
It was not that long ago that every WordPress tutorial under the sun preached the importance of creating a so-called “child theme“. And for good reason. A child theme was, in effect, a copy of your site on which you would execute your changes. This way, those changes would not be wiped out when the main theme would automatically update.
Today, however, many of the changes you used to have to make using code, can now be done quickly and safely using the WP “customize” option on the dashboard menu. Most importantly, any changes made using the customizer will survive automatic updates. As a result, the need for child themes has been greatly reduced.
Now that we’ve got the preliminaries out of the way let’s get into the meat and potatoes of customizing the WordPress admin area.
Customize the Login Page
The login page is what comes up when you go to “yoursite.com/wp-admin/”. If you are the site owner this is a great place to start your customization. Doing so states in no uncertain terms that this is your site and not one of the 400 million or so other WordPress sites out there today.

Customizing the login page used to require custom CSS code. Again, not anymore. As with just about every other aspect of WordPress development, there are numerous plugins now that will enable you to customize the login page with just a few clicks.
- Go to “Plugins”
- Then “Add new”
- Then search for “login”.
You will be presented with numerous plugins that will enable you to quickly and easily add a logo or background image and change other aspects of the WordPress login page.
Customizing the Main Admin Page
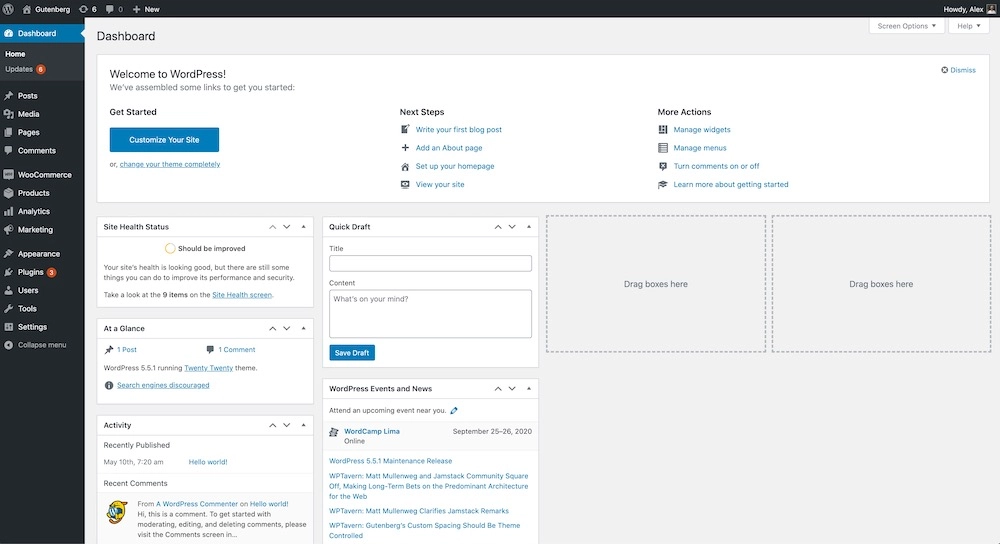
The admin page with its admin bar (often called the “toolbar”), large central area and left sidebar is like the reception area of an office. It’s where you make first contact with the business end of the website. From here you fan out through the website to make changes, add posts, install plugins and more.
Making sure this area is engaging and free of clutter is important if you are to make every interaction with the site as efficient and effective as possible. So let’s take a look at how we clean up the three main components of the main admin page (‘yoursite.com/wp-admin/index.php’) now, starting with the admin bar across the top.
Customizing the Admin Bar
The admin bar is that dark line that goes across the top of the admin page once you have logged in. Typically it includes the name of your site on the left, notifications (if any), possibly links to a few plugins, and the ‘howdy YourName’ welcome on the far right, which is also where you log out.
The simplest bit of customization you can do with the toolbar is to choose whether to make it visible or invisible. To change the visibility of the admin bar:
- Hover over the “Users” link on the dashboard sidebar.
- Click on “profile”.
- On the profile page check or uncheck the box that says “Show toolbar when viewing site”.
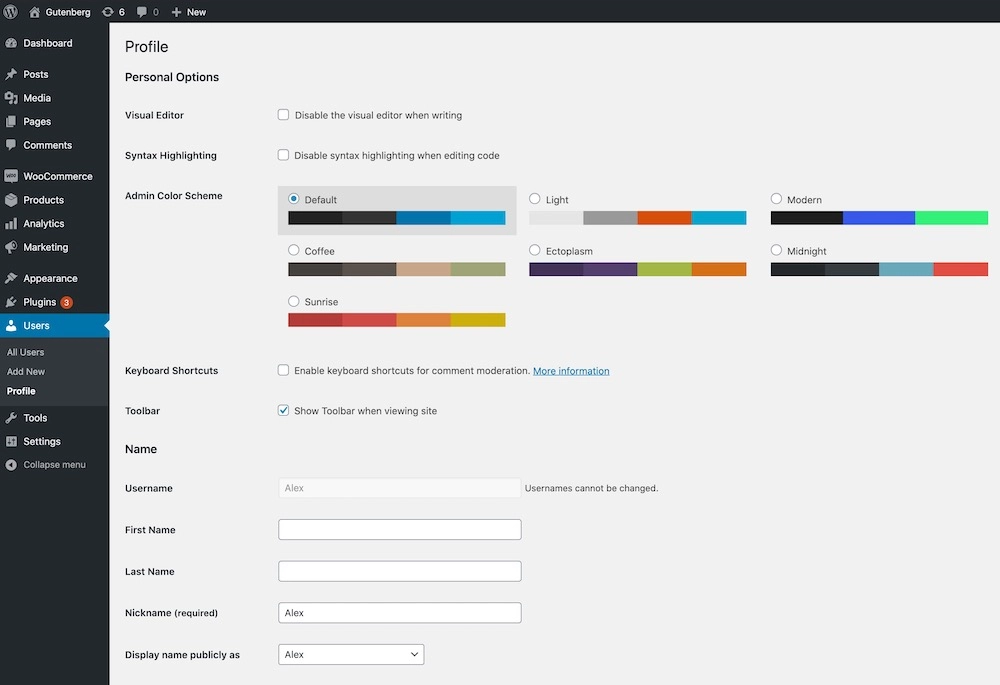
From the Profile page, you can also easily change the color scheme of the admin bar and the dashboard sidebar from the default black to something more colorful and engaging. And you can add or change the profile picture that appears on the admin bar.
If this degree of customization falls short of what you want there are, again, numerous plugins available that will provide greater control over the look and feel of the toolbar and the dashboard sidebar. Just go to “Plugins” and search for “admin bar”. “WP Admin UI Customize” is a popular choice. Although there are others to choose from that might be more to your liking.
Clean up the Center of the Admin Page Using Screen Options
There are a lot of ways you can customize a WordPress website. One of the most overlooked is sitting right in plain view. We are referring to the “Screen Option” tab at the top of the admin page, right under the ‘Howdy’ greeting.
If you have ever wondered why you have to sift through all those widgets on the admin page like “Quick Draft”, “WordPress Events”, “Site Health Status” and more the answer is, you don’t. If you want to remove some or all of them it can be easily done using the “Screen Options” tab.
Simply click on the tab and it will slide down revealing checkboxes for all those widgets that are taking up space in the center of your admin page. Just uncheck whichever ones you don’t want and voila! The center of your page is now free of unnecessary widgets.
But the clean-up fun does not stop there. You can do the same thing for other pages besides the main “index.php” page. For instance, click on the ‘Posts’ page and then click on “Screen Options”. You will see you have the option to clean up the post list by removing columns you don’t want or need. The end result is a much cleaner, more streamlined Posts page that’s less confusing and enables you to get to the point.
You can do the same for the “Plugins” page, the “Templates” page, the “Users” page and more. Just going through your admin area and removing these unneeded items will go a long way toward customizing WP to your liking.
Customizing the WordPress Admin Sidebar
We have already looked at the toolbar and the central area of the admin pages. Now let’s take a look at the admin sidebar and menu.
Sadly, the WordPress admin sidebar is one area over which WordPress gives you very little default control. Typically, the only way to change which items appear in the sidebar is by assigning different user roles. The six roles predefined by WordPress are:
- Super Administrator – Only available when more than one website is in play. The SA has access to and is able to edit or change every aspect of multiple sites from content to layout and more.
- Administrator – Referred to simply as “admin” the administrator has all the rights and privileges of the SA. But for one website.
- Editor – The Editor has complete control over site content. They also have the power to moderate comments, add or delete post categories and upload files. What they do not have is the ability to make any structural changes to the site.
- Author – The Author is a step down from the Editor. The author has total control over the posts they write, but cannot moderate comments, add categories or alter the look or functionality of the site in any way.
- Contributor – The Contributor can write posts but is unable to publish or delete them. They are also unable to make any changes to the site.
- Subscriber – Subscribers are “outsiders” who want to contribute comments or be notified of new posts. That is as far as their permissions go.
Maintaining strict adherence to these roles is vital for maintaining website security. As such, depending on the role assigned to an individual, the items they see in the sidebar menu will change. This is the only way WordPress provides to change the look or content of the admin sidebar. If you want a higher degree of control over the sidebar you will need to install a plugin.
Customizing the WordPress Admin Sidebar Using a Plugin
When it comes to providing enhanced customization for the sidebar it’s one more case of plugins to the rescue. As this is one area where WordPress gives users very little control, it is only natural that it’s an area that has drawn a lot of interest from plugin developers.
There are a number of different plugins that will provide you the ability to reorganize the WP admin sidebar menu. To find them:
- Go to the “Plugins” page.
- Click “Add New”.
- Search for “sidebar menu editor”, or just “menu editor”.
- A number of plugin options will be presented to you.
Simply choose the one you want, click “install” then click “activate” and you are ready to go.
The interface on these plugins is typically very simple and intuitive. You are presented with all the current menu items. All you have to do is create whatever new categories you want and then drag and drop items into that category.
For instance, you can create a category for “Unused Menu Items” and then drag whichever menu items you hardly ever use into that category. After saving and exiting the plugin, refresh your admin page and you will see all those links that were taking up space before are now tucked away behind the “Unused Menu Items” link.
But that is just one example. These plugins will give you the ability to reorganize the admin menu however you wish.
Conclusion
Between “Screen Options”, “Profile” options, the ability to assign different users different privileges and, of course, a wealth of plugins, it is easier than ever to customize the WP admin page and all of its components. If you need help with the process or have any questions about WordPress maintenance, development or troubleshooting contact the pros at Belov Digital Agency.


