

WordPress is the world’s #1 Content Management System because it is both remarkably versatile and remarkably effective. However, nothing is perfect. WordPress runs on PHP, a scripting language created by a Danish programmer in 1994. Originally the letters stood for “Personal Home Page”, but it has since been re-styled (rather clumsily) to mean “PHP: Hypertext Preprocessor”.
Like any computer language PHP does not tolerate mistakes. Even the tiniest syntax flaw will generate an error, and those errors can range from the nuisance variety to ones that derail an entire website. When PHP errors happen it’s vital you get on top of them quickly. And the best, most effective way to do that is to enable WordPress error logs.
About PHP Error Logs
A PHP error log is a running list of all error messages and warnings generated by WordPress in relation to your website. There are a lot of reasons why such errors might occur. A developer may have added some incompatible script to one of the site’s PHP files. Or there may be compatibility issues with a plugin. Or something unexpected may happen when a visitor to the site tries to use some embedded feature.
Whatever the issue, it’s vital that there be a record of it so that the developer can track down and correct the problem. That’s what the error log is for. While an experienced developer might know instinctively what is going on in a given situation, it’s still useful for them to have a log available to confirm their suspicions. And for less tech-savvy developers, the log is an absolute essential if they are to get to the bottom of things. So, let’s look at how to enable WordPress PHP error logs.
Enabling WordPress Logs to Monitor PHP Errors
One thing that makes the process of tracking a PHP error in WordPress a fairly straightforward affair is the fact that WP already includes what is known as “debugging mode”. Debugging mode is designed to track and log PHP errors.
“Great! So what’s the problem?” you say. Well, the problem is that debugging mode is, by default, deactivated. And activating it is not as simple as clicking a button. Fortunately, it’s not as difficult as pulling teeth either. Here are the steps to take to activate debugging mode and access those error files.
Note: Make sure to make a backup of your site before proceeding with the PHP debugging activation process. This will enable you to reset the site to its current state should you make an error of your own while attempting to activate PHP debugging mode.
Activate PHP Debugging Mode: Step 1
The first thing you will need to do is gain access to your WordPress core files, including the PHP files. This cannot be done using the WP dashboard. Instead, you will need to use an FTP client like Filezilla to gain direct access to these files.
If you don’t already have Filezilla installed on your computer it’s available as a free download and takes about a minute to install. Once installed, all you need do to log in this way is enter your FTP credentials. If you don’t have your FTP login info handy, you can obtain it from your web hosting company, typically through the control panel.
When you have the information you need, log into your site via FTP.
Activate PHP Debugging Mode: Step 2
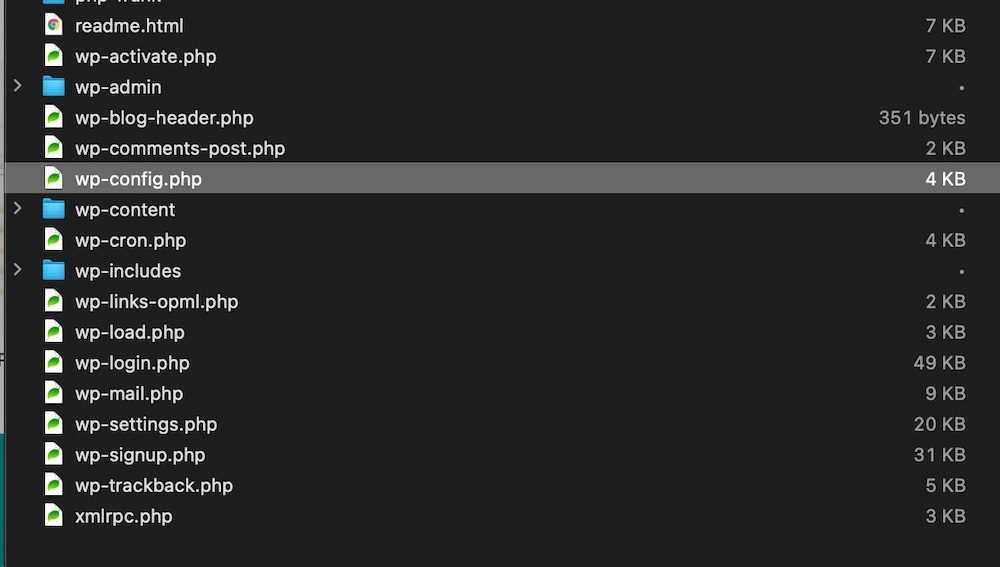
Once you have logged in using your FTP client, you will see your WordPress directories and files listed on the right-hand side of the FTP client interface. Scroll down through the listed files until you find the one called “wp-config.php”. “Config” stands for “configuration” and should give you some clue as to how important this file is. Which is why it should never be altered for trivial reasons.
Once you locate the wp-config file, right-click on it and select the “edit” option from the menu that appears. The file will open up in Notepad, (or whatever other program you use as your computer’s default text editor). Scroll down through the file until you see the following line of code:
define( 'WP_DEBUG', false );Change it to…
define( 'WP_DEBUG', true );That’s it. Don’t change anything else in this line. Don’t close or add any spaces. Just change the word false to the word true. That will enable PHP debugging mode.
With that, you are halfway home. Now you have to tell WordPress to create a PHP error log so you can see important information about the problem you are currently having. To do that, scroll down a bit more in the config PHP file until you come to the following line:
define( 'WP_DEBUG_LOG', false ); Change it to…
define( 'WP_DEBUG_LOG', true ); Once set to true, this command tells WordPress to create a file called “debug.log” that you will be able to find within the /wp-content/ directory. The debug.log file will list any and all PHP errors being generated by your site so you can then initiate corrective measures.
After making the above changes to the wp-config.php file you will need to save them. Saving the file will likely prompt your FTP program to ask you if you want to replace the existing file with the new, modified file. Click “yes” and close the file.
Trigger the Error Again
Now that you have modified the wp-config PHP file to activate debugging mode and create an error log, you can use that error log to see what is going wrong and fix it.
But first, you have to trigger the error that started all this. That’s because WordPress is not going to list any errors that occurred before you activated debugging mode. Therefore, until you trigger it again your new debugging log is going to be empty. So go back to your website and trigger the error again.
Locate the New PHP Error Log and Evaluate the Problem
Once you have triggered the error, go back to the FTP client, navigate to the root folder for your website, and look for the “wp-content” folder. Open it. Inside that folder, you will see the new debug.log file. Open it with your default text editor. It should list the error you just triggered and indicate what caused it.
Fixing the Problem
The new debug.log file will list any and all PHP errors encountered after it was created. But it does not fix anything or make any specific recommendations about how to fix the problem(s). All it does is list the PHP errors. So you have a couple of options.
First, you can attempt to decipher the PHP error log, track down the problem yourself and try to fix it. But this is rarely as easy as it sounds. You will need to be fairly tech-savvy and should have some experience troubleshooting PHP. If you do, great! If you don’t, you’re asking for trouble.
Another option is to copy the contents of the debug.log file, post them on a WP forum and ask for help. You may understand the answers you get, or you may not. If it’s all still Greek to you, then the best thing to do is to hire a professional familiar with PHP to handle the fix for you. Yes, you’ll have to part with a few ducats. But in the long run, it will be worth it.
Important Note: Once you have resolved the PHP error in WordPress that was causing the trouble, it’s important that you go back into the config.php file and deactivate debugging mode. This is especially crucial if your site is live. Leaving it activated will likely slow down your site and it may leave you exposed to hackers.
Conclusion
Being able to log a PHP error in WordPress is crucial if you are to solve a problem that is plaguing your website. Follow the steps laid out above and you’ll be on your way to setting things right. And in case things get complicated, we’ll be glad to help.


